
Second Stage of labour-
Definition
- The second stage of labour is the period from full dilatation of the cervix (10 cm) until the birth of the baby.
- It starts with the full dilatation of the cervix and ends with the expulsion of the fetus from the birth canal.
Types of Second Stage of Labour
1. Passive Second Stage/Propulsive Phase
- Begins when cervix becomes fully dilated.
- Uterine contractions continue.
- Mother may not yet feel a strong urge to bear down.
- Fetus descends gradually due to uterine contractions.
2. Active Second Stage/Expulsive Phase
- Mother develops a strong urge to push.
- Active bearing down efforts start.
- Ends with delivery of the baby.
.
Events in the Second Stage of Labour
Full cervical dilatation (10 cm)
↓
Strong uterine contractions
↓
Rapid descent of presenting part
↓
Urge to bear down develops
↓
Maternal bearing down efforts begin
↓
Increased intra-abdominal pressure
↓
Further descent of fetal head
↓
Flexion of fetal head
↓
Internal rotation of head
↓
Bulging of perineum
↓
Gaping of anus
↓
Crowning of fetal head
↓
Extension of head
↓
Delivery of head
↓
Restitution
↓
External rotation
↓
Delivery of anterior shoulder
↓
Delivery of posterior shoulder
↓
Expulsion of body
↓
Birth of baby
↓
Uterus contracts firmly after delivery
Nursing Management of Women in second Stage of Labour-
Objectives
- Ensure safe birth of the baby
- Maintain maternal and fetal well-being
- Prevent maternal exhaustion
- Prevent fetal hypoxia and birth trauma
- Prevent perineal injury
- Prepare for active management of the third stage of labour
Management of Second Stage of Labour
1. Recognition of Second Stage
Observe for-
- Full cervical dilatation (10 cm)
- Strong uterine contractions every 2–3 minutes
- Involuntary bearing-down efforts
- Bulging perineum
- Dilatation of anus
- Visible presenting part at vulva
2. Preparation of Mother
- Explain progress of labour and procedures
- Reassure and encourage the woman
- Maintain privacy and dignity
- Place mother in a comfortable position
- Clean vulva and perineum with antiseptic solution
- Empty bladder before delivery
3. Preparation of Delivery Room and Equipment
Ensure availability of:
- Sterile delivery set
- Sterile gloves and gown
- Cord clamps/ties and scissors
- Warm towels and baby linen
- Suction apparatus/mucus extractor
- Neonatal resuscitation equipment
- Oxytocin 10 IU for AMTSL
- Emergency drugs and oxygen
4. Maternal Monitoring
General Condition
Observe-
- Pulse every 15–30 minutes
- Blood pressure every 30 minutes
- Respiration and hydration status
- Signs of exhaustion or distress
Uterine Contractions
Assess-
- Frequency
- Duration
- Intensity
Normal contractions-
- Every 2–3 minutes
- Last 60–90 seconds
5. Fetal Monitoring
Fetal Heart Rate (FHR)
- Auscultate after every contraction or at least every 5 minutes
Normal:
- 110–160 beats/minute
Observe for-
- Bradycardia (<110 bpm)
- Tachycardia (>160 bpm)
- Meconium-stained liquor
6. Encourage Effective Bearing-Down Efforts
During contractions-
- Take a deep breath
- Hold breath
- Push down using abdominal muscles
Between contractions-
- Relax completely
- Breathe normally
- Conserve energy
Do not encourage pushing before full cervical dilatation.
7. Bladder Care During Second Stage of Labour
- Ensure the bladder is empty before and during the second stage.
- Encourage the woman to pass urine every 2–4 hours.
- If unable to void and the bladder is distended, perform aseptic catheterization.
Importance
- Facilitates descent of the fetal head
- Promotes effective uterine contractions
- Prevents prolonged labour
- Reduces risk of bladder injury and postpartum hemorrhage
8. Pain Relief During Second Stage of Labour
- Reassure and support the mother continuously.
- Encourage deep breathing and relaxation techniques.
- Provide a comfortable position and maintain privacy.
- Use analgesia or anesthesia as prescribed.
- Encourage rest between contractions.
Benefits
- Reduces pain and anxiety
- Increases maternal comfort
- Promotes effective pushing efforts
- Prevents maternal exhaustion
9. Maternal Position During Second Stage of Labour-Place the mother in a comfortable and safe position.
Common Positions:-
- Lithotomy position
- Semi-recumbent position
- Squatting position
- Left lateral position
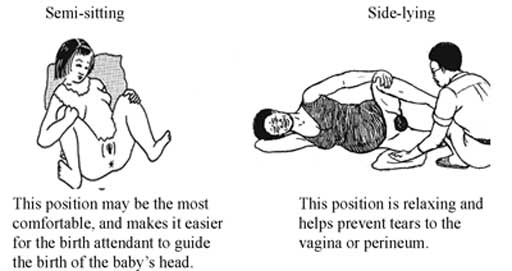
Benefits
- Promotes fetal descent
- Facilitates effective bearing-down efforts
- Improves maternal comfort
- Enhances uteroplacental circulation
10. Conduct of Delivery
During Crowning
Crowning:- The fetal head remains visible at the vulva and does not recede between contractions.
Management:-
- Support the perineum with one hand
- Control extension of the fetal head with the other hand
- Ask the mother to pant rather than push forcefully
- Allow gradual delivery of the head
Advantages
- Prevents perineal tears
- Prevents rapid expulsion of the head
- Reduces fetal trauma
11. Check for Nuchal Cord
After delivery of the head:
- Feel around the neck for umbilical cord
If loose:
- Slip over the baby's head
If tight-
- Clamp and cut between two clamps
12. Delivery of Shoulders and Body
Anterior Shoulder
- Gentle downward traction
Posterior Shoulder
- Gentle upward traction
Trunk and Legs
- Deliver gently without force
13. Immediate Care of the Newborn
- Receive baby on a warm sterile towel
- Dry immediately and thoroughly
- Maintain warmth (skin-to-skin contact if possible)
- Clear airway if required (mouth then nose)
- Assess breathing and crying
- Perform APGAR scoring at 1 and 5 minutes
- Eye care-Clean the baby's eyes with sterile cotton/gauze soaked in clean water or normal saline.Wipe from the inner corner (near the nose) to the outer corner
- Vitamin K-Within 6 hours after birth
- >1500 g: 1 mg IM once
- ≤1500 g: 0.3–0.5 mg/kg IM once
Delayed Cord Clamping
- Clamp cord after 1–3 minutes if baby is stable
Benefits-
- Approximately 80–100 mL of additional blood is transferred from the placenta to the newborn.
- This provides about 40–50 mg/kg of extra iron to the infant.
14. Episiotomy (If Indicated)
Indications
- Rigid perineum
- Large baby
- Instrumental delivery
- Breech delivery
- Fetal distress requiring rapid birth
15. Prevention of Postpartum Hemorrhage
After birth-
- Administer Oxytocin 10 IU IM within 1 minute of birth as part of Active Management of Third Stage of Labour (AMTSL)
16. Documentation
Record:
- Time of full dilatation
- Time of birth
- Duration of second stage
- Maternal vital signs
- Fetal heart rate findings
- Sex and condition of baby
- APGAR score
- Episiotomy/tear
- Drugs administered
Articles Required During Second Stage of Labour
1. Sterile Articles
- Sterile gloves
- Sterile gown/apron
- Sterile drapes and towels
- Sterile gauze pieces/swabs
- Cotton swabs
2. Delivery Tray Instruments
- Artery forceps (Kocher’s forceps)
- Sponge holding forceps
- Scissors
- Episiotomy scissors
- Needle holder
- Dissecting forceps
- Cord clamp
- Sterile blade
3. Suturing Materials
- Suture materials (chromic catgut/vicryl)
- Syringe and needles
- Local anesthetic (Lignocaine)
4. Cord Care Articles
- Cord clamp/tie
- Sterile cord scissors
- Kidney tray for placenta
5. Maternal Care Articles
- Mackintosh and draw sheet
- Perineal pads
- Bedpan
- Receiver for waste
- Measuring jar
6. Newborn Care Articles
- Warm sterile towels
- Baby receiving sheet
- Mucus sucker/bulb syringe
- Neonatal ambu bag and mask
- Radiant warmer
- Baby cap and clothing
7. Drugs and Solutions
- Oxytocin injection
- Emergency drugs
- Antiseptic solution
- IV fluids
8. Monitoring Equipment
- Fetoscope/Doppler
- BP apparatus
- Thermometer
- Stethoscope
- Pulse oximeter (if available)
9. Emergency Equipment
- Oxygen cylinder
- Suction apparatus
- Resuscitation tray
- Emergency tray for PPH management
Procedure
| Steps | Rational |
| Provide a comfortable position i.e.. Lying on her back with legs flexed. | To promote comfort and relaxation. |
| Assessment: Monitor uterine contractions and PV findings. | To assess the progress of labor. |
| Assess the parameters i.e.presentation, lie, attitude, position, station, cervical dilatation, effacement, etc. | Helps in examining the progress of labor. |
| Maintain the chart of progress i.e.. partograph. | To determine abnormalities, if any. |
| Observe the color of the liquor if membranes are ruptured. | Presence of meconium-stained liquor is an indication of fetal distress. |
| Monitor fetal heart rate and continue to check the mother's vital signs. | Fetal heart rate decreases during contraction; it recovers after contraction. |
| Ask the mother to empty the bladder and administer oxytocin if ordered. | |
| After confirmation of the 2nd stage of labor: Arrange all the articles after opening the delivery pack. | To save time. |
| Place the woman in a dorsal position with knees bent at the lower end of the delivery bed. | |
| Place a clean plastic sheet under the mother. | Permits more access to the perineum to assess the progress clearly. |
| Wear a plastic apron, mask, cap and shoe cover. Wash your hands and dry them. Wear sterile gloves. | |
| Drape the woman's perineum and delivery area. | To make the perineum free from microorganisms. |
|
Clean the perineal area and buttocks with cotton swabs dipped in antiseptic solution. Use one cotton ball for each stroke separately in the given order:
|
|
| Delivery of head: After the crowning take place, hold the fetal head with sterile towel/pad with one hand and maintain it in the flexion position. | This type of control maintains flexion and prevents pressure on perineum. |
| Use a clean pad with the other hand to support the perineum. | It is done to support the lower edge of the perineum by pinching so as to avoid tearing or trauma. |
| Encourage the mother to stop pushing, and bear down only during a contraction.Perform episiotomy, if needed. | To enable the physician to control the pace of the fetal head delivery. Precipitated delivery of the head can lead to perineal injury/trauma |
| Once the head is delivered, examine the baby's neck for the umbilical cord | It helps in the detection of nuchal cord, which avoids descend of the fetus as well as delivery of the body. |
| Cord assessment: If the cord is loose around the neck, then slide it over the head of the baby. If the cord around the neck is tight, then clamp the cord about 3 cm apart and cut in the middle. | To prevent the tightening of the cord around the neck. Tightening can cause fetal hypoxia and death. |
| Wipe out the mucus from the baby's face with clean gauze. | To facilitate breathing. |
|
Delivery of shoulders: Wait for the next contraction and watch for restitution and external rotation of the head. |
To allow time for rotation of shoulders to the anteroposterior diameter of the outlet. |
| Proceed to delivery when the shoulders reach the A-P diameter of the pelvic outlet. | |
| Deliver one shoulder at a time. | |
| With the next contraction, use a gentle downward traction towards the mother's sacrum to deliver the anterior shoulder | This allows the anterior shoulder to pass under the maternal pubic symphysis. |
| The posterior shoulder is delivered by applying a gentle upward traction holding each side of the head. | It is necessary to apply the least amount of traction during the delivery of fetal shoulders to reduce the risk of traction-induced perineal injury and fetal brachial plexus injuries. |
| Delivery of rest of the body: Grasp the baby around the chest and lift the baby towards the mother's abdomen. | Rest of the delivery of the body is spontaneous and requires minimal efforts by the mother. |
| Note down the time of birth. | |
| Cord cutting: Clamp the cord when the pulsation stops (normally 1-3 minutes). | In full-term vaginal deliveries, delay in cord clamping helps in preventing neonatal anemia. |
| The cord is clamped with two clamps and then cut between the clamps leaving about 1 inch or 3 cm from the abdomen of the baby. | |
| After the cord cutting, clean the newborn and dry him. After drying, wrap the baby in a clean, dry and warm cloth. Wipe both eyes with gauze. | To avoid heat loss. |
| Once delivery is complete, place the baby on the mother's abdomen. Inform the mother of the sex of baby. | |
|
APGAR Scoring:Evaluate APGAR scores at one-minute and five minutes. |
This test helps in checking a baby's heart rate, muscle tone, and other signs to detect the need for extra medical or emergency care. |
| If the baby is not crying and meconium is present then suction the mouth first and then the nose. Assess the baby for breathing. | To make the airway patent and initiate breathing. |
| Put an identification tag on the newborn. | To have correct identification. |
| Skin-to-skin contact: If the APGAR scores are within normal limits, transfer the infant to the mother immediately and place it on her abdomen. | Early skin-to-skin contact between the newborn and mother helps to increase mother-infant bonding, initiation of breastfeeding and minimizes heat loss by the infant. |
|
Expulsion of the placenta: Feel the contraction of the uterus by placing a hand over the fundus and observe the signs of placental separation. |
Contraction and separation of the placenta usually occur in 5 minutes. |
| After the descent of placenta, ask the mother to beardown. | Bearing down efforts along with contractions helps in the expulsion of the placenta |
| As soon as the placenta delivers, grasp it in cupped hands and place na clean tray for examination later on. | |
| Assessment: Examine mother's vulva, vagina and perineum. | For any laceration or trauma. |
| Massage the uterus. | To make the uterus contract for expulsion of any retained blood clots. |
| Perform episiotomy suturing layer by layer if done. | |
| Clean the vulva, vagina and perineum with an antiseptic solution. | To avoid chances of infection. |
| Place perineal pad. | To stop bleeding. |
| Make the mother comfortable. |